How to Create a Field
In this section, you will be walking through creating and setting up a new Field in Search Magic. You'll start by selecting the field that you'll be importing from the store, then setting up the search settings, the Filter settings and the Sort settings. Below are each settings and instructions on what they mean.

Store Import Settings
In the store import settings, you will select the field that will be imported and you can adjust how the data is imported into the Search Magic. Below is a list of what you can do in the import fields settings

- Select Store Field or Fields to import - You are able to select multiple fields to import from the store. If you select multiple fields you'll be able to mange how the data in the the fields are combined.
- How would you like to merge the import fields? - Allows you to manage how the multiple fields will be merged together.
- Field Data Added Separately - If the store import fields you are imported are completely separate fields, then you'll want to use this setting. For an example, if you have
- Combine Field Data - If the store import field data is separated between multiple fields, then you''ll want to combine the data. So for an example, if you have 2 meta fields or custom fields that has too much data and you had to add multiple fields to add the data, you'll want to set the Merge to Combine Field Data.
- Adjust Sort Order of the combined field data - If you selected Combine Field Data, you'll be able to adjust the sort order of the fields.
- How would you like to merge the import fields? - Allows you to manage how the multiple fields will be merged together.
- Format and customize how the data is imported into Search Magic. The imported field can be by seperated by a character, data appended, data pre-pending, data cleared or even mapping data from one value to another. You can see how that is done below.
- Separate Values By Character - If you have multiple values in the imported field and you have the data separated by comma you'd select the comma character from the drop down.
- Prepend the following data to the value - Add data in the input before the value in each field
- Append the following data to the value - Add data in the input after the value in each field
- Remove the following data from the value - Removes the inputt data in each field
- Map the value to another value - select values and map them from one field into another. You can group multiple values into one field if you'd like as well.
Search Field Settings
To include fields to be used in the search, you will need to be on the Search Settings tab

- Search Field Label - The Name and label of the field. The label is used as the Filtering Label as well.
- Allow Field to be Searched - This will allow the field to be included when searching.
- Search Weight - Will Boost the specific field so the field will have a higher relevancy score.
- Search Operator - Allows you to change how the field is searched.
- AND (Default) - For example, if a customer searches
blue shirt. Search Magic will search:blueANDshirt - OR - For example, if a customer searches
blue shirt. Search Magic will search:blueORshirt
- AND (Default) - For example, if a customer searches
- Include in Autocomplete Search Terms - This will include this field's data into the Instant Search Terms list.
Filter Settings
You can Add or Remove Filters in the Filters Tab on the Filters Details Page as shown below. In the filters tab, you have a few options to adjust. Below is a list of what you can do on the Filters tab.

- Do you want to include this field in Filter List - you simply need to select yes to Include field in filter list. If no, the field will not be included in the filter list
- Filter Operator - Will allow you to change the logic of how the filters are displayed. There are 2 options which are explained below.
- And - means that in order for the item to show up all filter values/options must be on the item/product. So for example, if the search results return a list of shirts that have a Features filter. The Features filter has values like Buttons, Pockets, Collar, etc. If the customer selects Buttons and Pockets. Then only shirts that have both Buttons AND Pockets will show.
- Or - means that in order for the item to show up one of the selected filter values/options must be on an item/product. So for example, if the search results return a list of shirts that have a Features filter. The Features filter has values like Buttons, Pockets, Collar. If the customer selects Buttons and Pockets. Then any shirts that have Buttons OR Pockets Features will show.
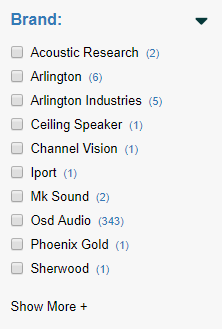
- Filter Display - Will allow you to adjust how the Filter values/options display on the search results or collection (if Category/collection enabled) page. There are 3 options that are available and they are below
- List - Displays the filter values/options in a simple list format.
- Slider - Displays the filter values/options in a slider. Option is only available in on filter values that are integers.
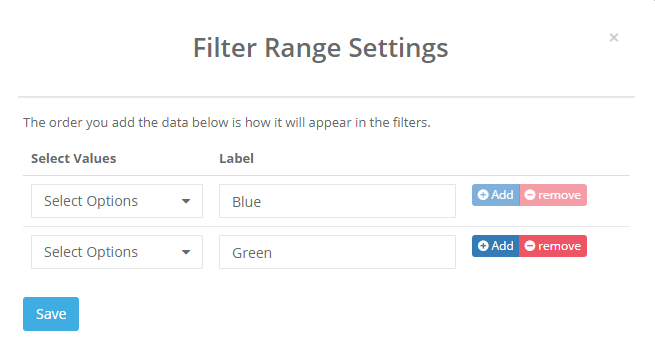
- Range - Will allow you to setup value/option ranges. There are 2 types of ranges that you can setup.
- For integer type filters like price or maybe shoe size. You can set up a filter range that looks like the below example.
- For string type filters, that could be anything from brand, colors, features, etc..., you will be able to actually map one filter value/option to another. So for example, if you have colors, like Navy, Turquoise, Sky Blue, Blue. You can map/combine these colors into a simple Blue filter value/option.
- List - Displays the filter values/options in a simple list format.
- Filter Appearance - There are 3 options available.
- Standard - Is the standard list
- Color - Allows you to change the styling to color Blocks. Example Below.
- Star Reviews. - Allows you to change the style to Star ratings. Example below
- Standard - Is the standard list
- Filter Value/Options Sort order - This option allows you to change the Sort order of the filter value/options. There are 5 sort options available and they are shown below
- Alphabetical - Sorts the filter value/options in alphabetical order
- Reverse Alphabetical- Sorts the filter value/options in reverse alphabetical order
- Ascending Count - Sorts the filter value/options in least filter values to most
- Descending count - Sorts the filter value/options in most filter values to least
- Custom - Allows you to set up a custom value/options sort. On a desktop you will be able to drag and drop by the filter value by click
 icon and hold down the click and move to the position you’d like. Or you may be able to change the position number, to move the filter value/option.
- Filter Label - To change the filter label, you need to go to the Search Settings tab and then change the label field to what you want the filter label to be. As shown below.


 icon and hold down the click and move to the position you’d like. Or you may be able to change the position number, to move the filter value/option.


Sort Settings
In this section, you’ll learn how to add or remove sorts, adjust the sort label and create a custom sort option.

- Do you want to include this field in Sort By list? - click on Yes to Include field in Sort by list, to see the Sort Options that you have available, You’ll then be able to check add Ascending Order or Descending Order to add or remove the sorting option.
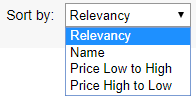
- Label - Allows you to change the Sort listing in the Sort By drop-down as shown below.
- Advanced Settings - In the advanced Sort option setting, you can add additional fields to be able for sorting.
- Add - Click the add button to add and additional field to sort
- Remove - button to remove the field option.
- Field - Select the search field in the drop-down list, to apply sorting to.
- Action - We have 2 sort actions available.
- Sort By - Allows you to select an Ascending or Descending sort options
- Equals - Allows you to select a specific value/option in a field to sort first.